Be yourself; Everyone else is already taken.
— Oscar Wilde.
This is the first post on my new blog. I’m just getting this new blog going, so stay tuned for more. Subscribe below to get notified when I post new updates.
Be yourself; Everyone else is already taken.
— Oscar Wilde.
This is the first post on my new blog. I’m just getting this new blog going, so stay tuned for more. Subscribe below to get notified when I post new updates.
An incident is an event, which may result in a failure or interruption of the activities, facilities or functions of an organization. Incident management (I.C.M) is a term that describes an organization’s activities. These activities include identifying, analyzing and correcting hazards. This is to prevent a future re occurrence of hazards. You can manage such events by either an incident response team (I.R.T), or an incident management team (I.M.T). Incident Command System (I.C.S) within a formal organization may also manage them. An incident can interrupt business processes, information security, IT systems, staff, customers. Besides it also interrupts other critical business functions without effective incident management.
How ServiceNow incident management Assist the processes?
ServiceNow Incident Management assists in the following ways in the incident management process.
Any consumer can report an incident and track it through the entire life cycle of an incident until you can restore service and the problem solved.
Features of ServiceNow incident management
The features of ServiceNow incident management are as follows.
Logging an incident Location Process Service desk call or walk-in Service Desk (I.T.I.L) agents can log incidents in the Incident application from the Build New module, or select New from the Incident list.
Users of the service catalog ESS can use the Build, a New Incident record producer in the service catalog. This record producer sets to Self-Service the area of communication form of the resulting incident.
Under inbound email behavior, an email sent to the mailbox instance will cause an accident.
Note: If you switch on the Security Incident Response plug-in, you can press the Build Security Incident button on the New Incident form to build and display a security incident from the incident currently.
Generating ServiceNow incident management application
They can automatically create incidents from pre-established conditions, in addition to getting users reporting incidents. Business rules use JavaScript to create an accident after satisfying a certain set of conditions.
ServiceNow Incident management state model
Incident management offers a robust state model for transferring and monitoring events through various states.
Domain Separation and Incident Management
Let us discuss the domain Separation and Incident Management process. Domain separation helps you to divide data, procedures, and administrative tasks. You can divide them into so-called logical groupings. Manage several aspects of this separation. This includes which users can see and access data.
ServiceNow’s main feature is the use of the major incident management ServiceNow technology. Under the I.T.I.L concept, you can call an unplanned interruption to an IT service or a drop in the quality of an IT service incident. Application authentication error, antivirus error, server room fan and you may regard it so forth as examples of incidents.
Getting ready for an active ServiceNow instance, valid credentials, and an admin or I.T. I. L function. These are all you need to move through this process. Let us deploy a problem management ServiceNow application.
Deploying ServiceNow incident management application for problem management
(http :/{ instance name}.service-now.com) in the address bar. Then type your credentials in the respective fields and press enter button.
The functions of ServiceNow incident management application
The table of events expands the table of tasks from which it obtains all the task table resources. When you click Create New module, an incident form will appear. Then you can fill the information. ServiceNow produces an incident number with the specific number named System ID. Then after clicking on the Submit button, You need to establish a relationship for the assignment. This is to the support group under System Policy Application in Assignment Lookup. Assignment and Data Lookup Modules store the relationship between category and subcategory. Then assign an incident to the support group when you meet the condition.
You should not permit the End users or users without any function to create the incident. From the view of IT as they do not have access to view this application. However, I.T.I.L users can create the incident from the view of the IT. It is necessary to remember that the incident program does not have workflow.
Conclusion:
I hope you reach a conclusion about ServiceNow incident management. You can learn more about ServiceNow incident management through ServiceNow Online training.
In this tutorial, you learn how to use SSIS Designer to create a simple Microsoft SQL Server Integration Services package. The package that you create takes data from a flat file, reformats the data, and then inserts the reformatted data into a fact table. In following lessons, the package is expanded to demonstrate looping, package configurations, logging, and error flow.
When you install the sample data that the tutorial uses, you also install the completed versions of the packages that you create in each lesson of the tutorial. By using the completed packages, you can skip ahead and begin the tutorial at a later lesson if you like. If this tutorial is your first time working with packages or the new development environment, we recommend that you begin with Lesson1.
MicrosoftSQL Server Integration Services (SSIS) is a platform for building high-performance data integration solutions, including extraction, transformation, and load (ETL) packages for data warehousing. SSIS includes graphical tools and wizards for building and debugging packages; tasks for performing workflow functions such as FTP operations, executing SQL statements, and sending e-mail messages; data sources and destinations for extracting and loading data; transformations for cleaning, aggregating, merging, and copying data; a management database, SSISDB, for administering package execution and storage; and application programming interfaces (APIs) for programming the Integration Services object model.
The best way to become acquainted with the new tools, controls, and features available in Microsoft SQL Server Integration Services is to use them. This tutorial walks you through SSIS Designer to create a simple ETL package that includes looping, configurations, error flow logic, and logging. For more info ETL Testing Training
This tutorial is intended for users familiar with fundamental database operations, but who have limited exposure to the new features available in SQL Server Integration Services.
To run this tutorial, you have to have the following components installed:
AdventureWorksDW2012.bak from AdventureWorks sample databases and restore the backup.C:\Program Files\Microsoft SQL Server\100\Samples\Integration Services\Tutorial\Creating a Simple ETL Package. If you unzip the download to another location, you may have to update the file path in multiple places in the sample packages.Create a project and basic package with SSIS
In this lesson, you create a simple ETL package that extracts data from a single flat file source, transforms the data using two lookup transformations, and writes the transformed data to a copy of the FactCurrencyRate fact table in the AdventureWorksDW2012 sample database. As part of this lesson, you learn how to create new packages, add and configure data source and destination connections, and work with new control flow and data flow components.
Before creating a package, you need to understand the formatting used in both the source data and the destination. Then, you be ready to define the transformations necessary to map the source data to the destination.
This tutorial relies on Microsoft SQL Server Data Tools, a set of example packages, and a sample database.
For this tutorial, the source data is a set of historical currency data in a flat file named SampleCurrencyData.txt. The source data has the following four columns: the average rate of the currency, a currency key, a date key, and the end-of-day rate.
Here is an example of the source data in the SampleCurrencyData.txt file:
1.00070049USD9/3/05 0:001.001201442
1.00020004USD9/4/05 0:001
1.00020004USD9/5/05 0:001.001201442
1.00020004USD9/6/05 0:001
1.00020004USD9/7/05 0:001.00070049
1.00070049USD9/8/05 0:000.99980004
1.00070049USD9/9/05 0:001.001502253
1.00070049USD9/10/05 0:000.99990001
1.00020004USD9/11/05 0:001.001101211
1.00020004USD9/12/05 0:000.99970009
When working with flat file source data, it’s important to understand how the Flat File connection manager interprets the flat file data. If the flat file source is Unicode, the Flat File connection manager defines all columns as [DT_WSTR] with a default column width of 50. If the flat file source is ANSI-encoded, the columns are defined as [DT_STR] with a default column width of 50. You probably have to change these defaults to make the string column types more applicable for your data. You need to look at the data type of the destination, and then choose that type within the Flat File connection manager.
To get in-depth knowledge, enroll for a live free demo on ETL Testing Online Training
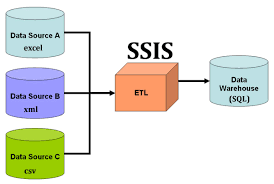
ETL stands for Extract, Transform & Load. In todays Data Warehousing world, this term should be extended to E-MPAC-TL or Extract, Monitor, Profile, Analyze, Cleanse, Transform & Load. In other words : ETL with the necessary focus on data quality & metadata.
The figure underneath depict each components place in the overall architecture.

The main goal of Extracting is to off-load the data from the source systems as fast as possible and as less cumbersome for these source systems, its development team and its end-users as possible. This implies that the type of source system and its characteristics OLTP system, OLTP legacy data, multiple instances, old Data Warehouse, archives, fixed & variable external data, spreadsheets – should be taken into account as much as possible.
Furthermore it also implies that the most applicable extraction method should be chosen source date/time stamps, database triggers, database log tables, various delta mechanisms, full versus incremental refresh, delta parameterization, controlled overwrite, hybrid depending on the situation. For more info ETL Testing Certification
Transform & Loading the data is about integrating and finally moving the integrated data to the presentation area which can be accessed via front-end tools by the end-user community. Here the emphasis should be on really using the offered functionality by the chosen ETL-tool and using it in the most effective way. It is not enough to simply use an ETL-tool, but still use various backdoors which do not maximize the usage of the tool. Secondly, in a medium to large scale data warehouse environment it is essential to standardize (dimension and fact mappings) as much as possible instead of going for customization. This will reduce the throughput time of the different source-to-target development activities which form the bulk of the traditional ETL effort. A side-effect in a later stage is the generation of the so-called ETL-scripts based on this standardization and pre-defined metadata. Finally, the different individual mappings or jobs should aim for re-usability and understandability resulting in small enough pieces which can be easily debugged or tested for that matter.
Monitoring of the data enables a verification of the data which is moved throughout the entire ETL process and has two main objectives. Firstly the data should be screened. Here a proper balance should be reached between screening the incoming data as much as possible and not slowing down the overall ETL-process too much, when too much checking is done. Here an inside-out approach, as defined in Ralph Kimball screening technique, could be used. This technique can capture all errors consistently, based on a pre-defined set of metadata business rules and enables reporting on them through a simple star schema, enabling a view on data quality evolution over time. Secondly a close eye should be kept on the performance of the ETL process, meaning capturing the right operational metadata information. This metadata information embraces, start and end timings for ETL-processes on different layers (overall, by stage/sub-level & by individual ETL-mapping / job). It should also capture information on the treated records (records presented, inserted, updated, discarded, failed ). This metadata will answer questions on data completeness and ETL performance. This metadata information can be plugged into all dimension & fact tables as a so-called audit dimension and as such it could be queried as other dimensions.
One step further down quality assurance processes between the different stages could be defined. Depending on the need, these processes can check the completeness of values; do we still have the same number of records or totals of certain measures between different ETL stages? Of course this information should also be captured as metadata. Finally data lineage should be foreseen throughout the entire ETL process, including the error records produced. This embraces transparent back-pointers to the source system or original source interface files for that matter. File names, line number, business keys, source system identifiers etc. should be dragged along properly and even be made available in the front-end tools in order to re-assure the end-users of the correctness and completeness of the information.
Next to the operational metadata it is essential that the data model metadata is properly integrated with the source-to-target detail information, next to all other associated characteristics such as the slowly changing dimensions type of a dimension, calculation of derived measures, etc.
Data Profiling is used to generate statistics about the sources and as such the objective here is to understand the sources. It will use analytical techniques to discover the true content, structure and quality of the data by deciphering and validating data patterns & formats and by identifying and validating redundant data across data source. It is important that the correct tooling is put forward to automate this process, given the huge amounts and variety of data.
Data Analysis will analyze the results of the profiled data. In this way data analyzing makes it easier to identify data quality problems such as missing data, invalid data, inconsistent data, redundant data, constraints problems, parent / child issues such as orphans, duplicates … It is important to correctly capture the results of this assessment, since it will become the communication medium between the source and the data warehouse team for tackling all outstanding issues. Furthermore the earlier mentioned transformation activities will also benefit from this analysis in terms of pro-actively coping with the perceived data quality. It is obvious that the source-to-target mapping activities highly depend on the quality of the source analysis.
Within the source analysis the focus should not only be on the sources “As Is, but also on its surroundings; obtaining proper source documentation, the future roadmap of the source applications, getting an insight on the current (data) issues of source, the corresponding data models (E/R diagrams) / meta data repositories and receiving a walk-through of source data model & business rules by the source owners. Finally it is crucial to set up frequent meetings with source owners to detect early changes which might impact the data warehouse and the associated ETL processes.
In the data Cleansing section, the errors found can be fixed based on a pre-defined set of metadata rules. Here a distinction needs to be made between completely or partly rejecting the record and enabling a manual correction of the issue or by fixing the data through for example completing the record, correcting the inaccurate data fields, adjusting the data formatting etc.
E-MPAC-TL is an extended ETL concept which tries to properly balance the requirements with the realities of the systems, tools, metadata, technical issues & constraints and above all the data (quality) itself.
To get in-depth knowledge, enroll for a live free demo on ETL Testing Training
Alteryx and Tableau are powerful tools that can revolutionize data analytics and data consumption in any organization. Alteryx is a user-friendly ETL platform with a powerful suite of tools, including spatial and predictive analytics. Tableau is the best tool for sharing data in a dynamic visualization. The days of static cross-tabs are over. Consumers of reports want the ability to drill into the data. The partnership between Alteryx and Tableau allows the analyst to spend time analyzing, finding trends and utilizing their company’s data in a way that drives business decisions. Alteryx and Tableau seamlessly bridge the gap between transforming raw data and a finished, dynamic report. In this blog, we will cover how to transform address fields in Alteryx for Tableau.
Alteryx has many strengths. It is the best tool for analysts to use in regards to transforming, cleaning, calculating, joining and preparing data; however, it is not the best at displaying a final product. That’s where Tableau steps in. Tableau can be bogged down by very large data sets and is most efficient when these data sets are turned into a .tde (Tableau Data Extract). Alteryx can power through any amount of data and export that final product as a .tde for visual analysis and make the findings transparent, secure and dynamic for an entire organization.
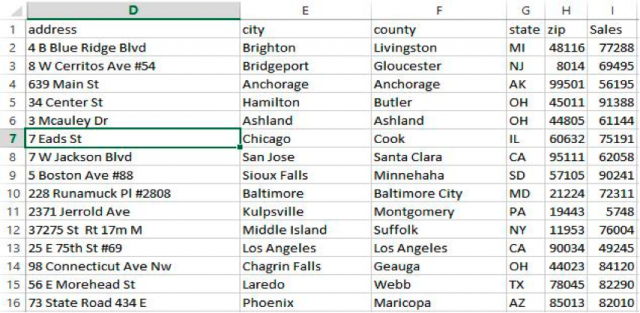
One example of using Alteryx as a tool for preparing data for visual analysis is with addresses. It should be noted that my background is in spatial analytics, and while Tableau’s mapping and geocoding functions are beneficial, they are not as robust as I would like (the ability to bring in shapefiles would be great). This is where Alteryx saves the day. Take, for example, a data set with addresses. Tableau will not recognize addresses as a geographical feature. Tableau will recognize and geocode some types of data including countries, states and cities. However, for more detailed points, one must use the latitude and longitude of a particular point for Tableau to recognize and plot these features on a map. For more info Tableau Training
How many of you keep the latitude and longitude of every single address on file? Exactly. To transform raw addresses into a latitude and longitude format, Alteryx has a suite of address tools including CASS (used to standardize an address field to USPS standards) and Street Geocoder (used to create a spatial object and/or latitude and longitude for an address).
We will take this randomly generated customer sales list that includes addresses and sales:
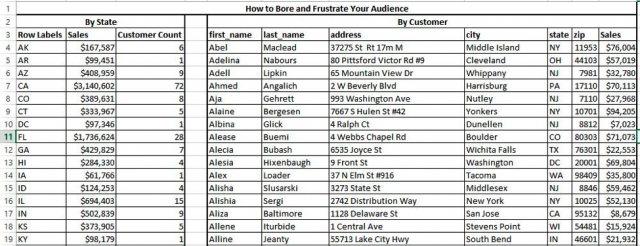
Say my end-user wants to view this data in two forms: Sales by State and Sales by Customer. I could produce a static cross-tab like this:
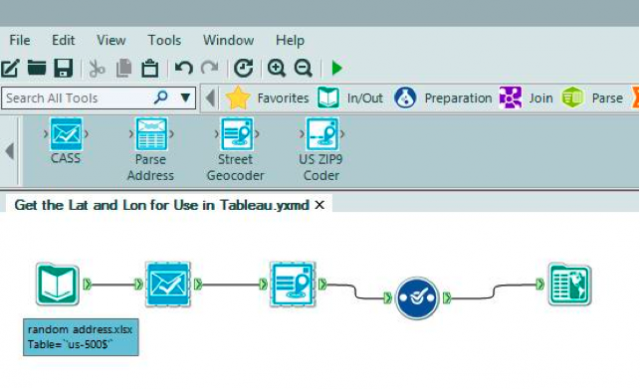
Or I could put this data into Alteryx and utilize the address tools to format it for a dynamic analysis within Tableau.
Alteryx Module:
The .tde I am saving looks like this:

By doing this in Alteryx, we now have an address file that is up to USPS standards (CASS), the latitude and longitude for every address, and the ability to map these points and display them in Tableau. Saving as a Tableau Data Extract will increase performance in Tableau when I put this data into a dynamic dashboard. I will have two dashboards: One that displays Sales by State (with states colored by the sum of sales) and another that displays Sales by Customer (with graduated symbols to reflect the total sales to that customer). The consumer of this dashboard will be able to select a state, and after doing so, a separate map of all customers in that state will populate the dashboard through an action command in Tableau.
Tableau recognizes the new Lat and Lon field from Alteryx as a Measure. They should be dragged up to the Dimensions field instead so they operate as a discrete field.
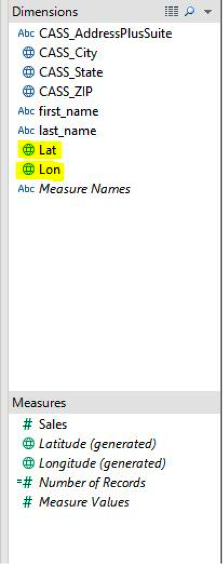
One view is made with State and Sales (Tableau automatically recognized state and aggregated sales by state) and another view with the Lat and Lon fields from Dimensions. These points are sized by sales.
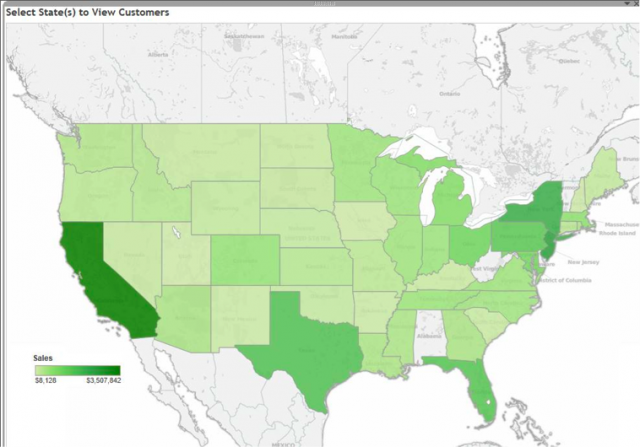
California is selected and the title of the Sales by Customer dashboard is automatically populated to reflect the selection:
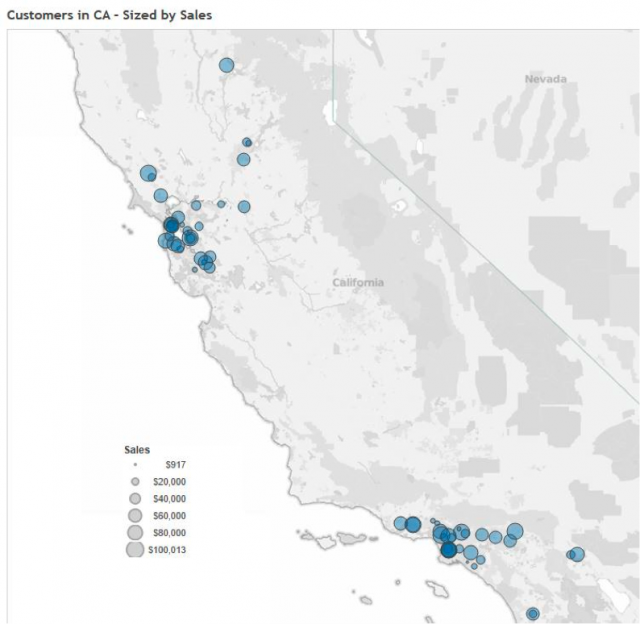
The consumer of this dashboard can then hover over each customer to activate the Tooltip in Tableau, displaying the information for that customer such as name, address and sales.
This is just one example of utilizing Alteryx to prepare data for analysis in Tableau. Any module built in Alteryx can be put on a scheduler to run when the raw data is updated. After the module is built and the finished product exported as a .tde, Tableau Server could host these Tableau Data Extracts. An analyst would use the .tde to create dynamic dashboards hosted on Tableau Server. The dashboards would automatically update as the data is updated and send to the server from Alteryx, thus freeing up time for the analyst to analyze and not create new reports every time data is updated.
To get in-depth knowledge, enroll for a live free demo on Tableau online training
Any enterprise organization looking for a human capital management (HCM) solution should compare Workday vs. SAP SuccessFactors. These vendors are titans of the cloud-based HCM space. And given the mission-critical tasks you’ll need such a system to perform, you shouldn’t skimp when it comes to researching an HCM purchase. We provide this in-depth comparison to help you make a more informed decision about whether or not Workday or SuccessFactors is right for you, but there’s an easier way.
If you’d rather speed up your research process without forgoing quality of research, we’re here to help. Use our Product Selection Tool to receive five personalized HCM software recommendations, delivered straight to your inbox. It’s free to use our tool, and it takes less than five minutes to get your vendor shortlist. Get started by clicking the banner below. For more info Workday Training
What is Workday?

TechnologyAdvice rating: 4.5/5
Workday is a cloud-based ERP software provider that describes itself as a “…single system for finance, HR, and planning.” A software-as-a-service (SaaS) pioneer, Workday was built by the same brains behind what is now Oracle PeopleSoft. It works best for medium and large enterprises. Workday offers many different products, but for the sake of this article, we’ll focus exclusively on its HCM solution, which performs functions like human resource management (HRM), reporting and analytics, talent management, compliance, payroll management, and learning and development. Workday is a publicly-traded company and is trusted by major brands such as National Geographic, Netflix, and AirBnB.
What is SAP SuccessFactors?
TechnologyAdvice rating: 4/5
From the massive ERP software company SAP comes SuccessFactors, a cloud-based HCM solution for organizations of all sizes. SuccessFactors is one of Workday’s top competitors, and it works well for companies with a global presence. Inside the system, you’ll find many of the same features offered by similar products in the HCM space: a human resources information system (HRIS), time and attendance, recruiting and onboarding, learning and development, and workforce planning and analytics. Organizations from around the world trust SuccessFactors as their HCM, from the San Francisco 49ers in the United States to Jaguar Land Rover in the United Kingdom.
To get in-depth knowledge, enroll for a live free demo on Workday Online Training
ou can use Workday Connector to connect to Workday from Data Integration. You can read data from or write data to Workday.Workday is an on-demand Cloud-based Enterprise Resource Application that includes financial management and human capital management applications. Workday exposes the web service API, which the Secure Agent uses to perform integration tasks through the SOAP protocol.

You can use Workday Connector in a Source transformation, Target transformation, or midstream in a Web Services transformation to connect to Workday from Data Integration and interact with the Workday service to perform operations on non-relational hierarchical data. For more info Workday Online Training
When you use Workday Connector midstream in a mapping, you first create a business service for the operation that you want to perform in Workday. You then associate the business service in a Web Services transformation midstream in a mapping to read from or write data to Workday.With Workday V2 connection, you can access all the services and operations supported for the SOAP-based web service version in Workday.
When you perform an operation from Data Integration, you can convert the hierarchical data structure for data retrieved from Workday to a relational format before you write to relational tables. You can also convert the relational format to hierarchical format before you write data from relational sources to Workday.
You are a human resources administrator and you want to archive the details of employees who left the organization in the past month. You can find the employee in Workday based on the employee ID, retrieve worker data through the Get_Workers operation, and then write the details to an Oracle database target. With Workday Connector, you retrieve the worker data in an XML structure and then define a corresponding relational structure to write to the relational target.
The following table lists the Workday transformation types that you can include in Data Integration tasks: Learn more skills from Workday Integration Training
| Task Type | Transformation Type |
|---|---|
| Synchronization | – |
| Mapping | Source, Target, and Midstream |
| PowerCenter | – |
As a user, you can use Workday Connector after the organization administrator performs the following tasks:
To get in-depth knowledge, enroll for a live free demo on Workday Training
When referring to business intelligence quality assurance, we often discover that the terms data warehouse (DWH) testing and ETL Testing are used interchangeably as though they are one and the same.
Data warehouses can be defined as a collection of data that may include all of an organization’s data. They came into existence due to more focus from senior management on data as well as data-driven decision making (business intelligence). Historical collections of online transaction processing (OLTP) data, combined with continuous updating of current data for analysis and forecasting, is implemented to support management decisions.
Since many organizational decisions depend on the data warehouse, the data should be of the highest quality. for more info ETL Testing Certification
To ensure that organizations make smart, accurate decisions, testing should be planned and executed very efficiently to avoid erroneous data being pumped into the database—then ultimately obfuscating senior management’s decision-making process.
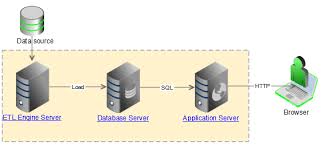
ETL testing is a sub-component of overall DWH testing. A data warehouse is essentially built using data extractions, data transformations, and data loads. ETL processes extract data from sources, transform the data according to BI reporting requirements, then load the data to a target data warehouse. Figure 1 shows the general components involved in the ETL process.

Figure 1: ETL testing for data staging, data cleansing, and DWH loads
After selecting data from the sources, ETL procedures resolve problems in the data, convert data into a common model appropriate for research and analysis, and write the data to staging and cleansing areas—then finally to the target data warehouse. Among the four components presented in Figure 1, the design and implementation of the ETL process requires the largest effort in the development life cycle. ETL’s processes present many challenges, such as extracting data from multiple heterogeneous sources involving different data models, detecting and fixing a wide variety of errors/issues in data, then transforming the data into different formats that match the requirements of the target data warehouse.
A data warehouse keeps data gathered and integrated from different sources and stores the large number of records needed for long-term analysis. Implementations of data warehouses use various data models (such as dimensional or normalized models), and technologies (such as DBMS, Data Warehouse Appliance (DWA), and cloud data warehouse appliances).
ETL testing includes different types of testing for its three different processes (extract, transform, load).
Data extraction tests might check that:
Data transformation tests might check that:
Data loading testing might check that:
Several components of DWH development and test are not usually components of the ETL tool or stored procedures that may be used in the ETL process – therefore, testing these processes will be accomplished independent of ETL tests.
For example, this includes use of tools to profile data sources for format and content issues, checks for missing source data/records, DWH security, etc. These categories of testing can be considered “DWH infrastructure verifications.”
“DWH/BI infrastructure” generally consists of:
DWH/BI infrastructure components must be tested for (among other things) scalability, security, reliability, and performance (e.g., with load and stress tests). DWH/BI infrastructure as a whole supports data warehouse data movement as shown in Figure 2.

Figure 2: The data warehouse infrastructure supports all DWH, ETL, and BI Functions
Data warehouse infrastructure basically supports a data warehousing environment with the aid of many technologies.
Front-end BI applications are often desktop, web, and/or mobile applications and reports. They include analysis and decision support tools, and online analytical processing (OLAP) report generators. These applications make it easy for end-users to construct complex queries for requesting information from data warehouses—without requiring sophisticated programming skills.
End user reporting is a major component of any business intelligence project. The report code may execute aggregate SQL queries against the data stored in data marts and/or the operational DW tables, then display results in the required format (either in a web browser or on a client application interface).
For each type of report, there are several types of tests to be considered:
The following graphic lists categories of tests that should be considered for DWH and BI report testing. From this list, those planning DWH/ETL/BI tests can select and prioritized the types of testing they will/should perform during each phase of testing during a project.
To get in-depth knowledge, enroll for a live free demo on ETL Testing Online Training
Data in its “raw” form, in other words, the state in which it exists which it is first created or recorded, is usually not sufficient to achieve a business’s intended goals. The data needs to undergo a set of steps, typically called ETL, before it can be put to use. Those steps include the following:
For example, consider an online retailer that wants to use sales data to make product recommendations for visitors to its website. To do this, the business must first extract only the relevant data from the database that it uses to record transactions (which, in addition to information about product trends, might include other, non-relevant information, such as which operating system a customer used for each transaction).
Then, the data must be transformed by removing missing entries and converted into a format that can be used by a cloud-based product recommendation engine. Finally, the prepared data is loaded into the recommendation engine, which uses the information to suggest products to website visitors.
Although the acronym ETL implies that there are only three main steps in the ETL process, it may make more sense to think of ETL architectures as being longer and more complicated than this, since each of the three main steps often requires multiple processes and vary based on the intended target destination. This is especially true of the transformation step. Not only does this step include running data quality checks and addressing data quality errors, it changes based on whether it occurs on a staging site or in a cloud data warehouse.
These processes, which are essential for ensuring that data can be used to achieve its intended goal, may require repeated passes through each data set.
ETL processes are complex and establishing an ETL architecture that meets your business’s needs requires several distinct steps.
ETL architectures are complex, and businesses may face several challenges when implementing them:
The ETL process can be performed manually or automatically. However, except in cases where the data you are working with is so unusual that it requires manual processing, an automated ETL architecture is the preferable approach. Automation helps you achieve the fastest and most consistent ETL results while optimizing cost, automation is critical.
Although setting up a fully automated ETL architecture may seem daunting, Talend Data Fabric makes automated ETL easy with cloud-based data management tools. By delivering a complete suite of cloud-based apps focused on data collection, integrity, transformation and analytics, Talend Data Fabric lets you set up an ETL architecture that supports virtually any type of data source in just minutes. By leveraging machine learning, enabling integration with a myriad of cloud data warehouse destinations, and ensuring scalability, Talend Data Fabric provides companies with the means to quickly run analytics using their preferred business intelligence tools.
To get in-depth knowledge, enroll for a live free demo on ETL Testing Online Training
Workday vs. Oracle for human capital management (HCM) is always going to be a difficult comparison. It wasn’t long ago that Oracle took over PeopleSoft to gain a better position in the HR space, forcing the PeopleSoft CEO to leave and start another people-focused ERP company built on cloud technology. Workday is that company.
Workday vs. Oracle HCM Cloud are just two of many full-service business software choices that include a comprehensive human capital management tool. Get recommendations for the best HCM for your medium or enterprise company via our Product Selection Tool. It only takes five minutes, and we’ll give you a shortlist of the top HR software options for you. Click the image below to get started.
Oracle is consistently ranked as one of the largest and most profitable companies in the world, but profitability doesn’t always equal innovation. Oracle’s long-standing love affair with on-premise technology made it difficult for the company to pivot to the cloud. Workday was built for the cloud. From its beginning it could push faster updates, it contained better data analytics tools, and it had a more user-friendly user interface. Oracle’s on-premise systems needed extensive modernization to compete with the cloud giants. For more info Workday Training
Oracle has come a long way since those early days of fighting to keep up with the innovators, and Oracle Cloud HCM is—in part—the result of that struggle. The sleek interface is built on the solid foundation of Oracle’s cloud database offerings. It’s a user-friendly face on powerful data connectivity and tool integrations across business departments. And while Oracle has gained ground in usability, Workday’s innovation has slowed somewhat. That makes these two choices a fairly even match.
At a high level, there’s not much difference between today’s Oracle HCM and Workday HCM. This article details the differences in the human resources management and talent management modules for both systems, and briefly discusses suggestions for a smooth implementation.
Workday is a cloud database-based human capital management software for medium to enterprise-sized companies. Human resource and talent management modules give CHROs and directors a high-level understanding of how hiring, firing, retention, and individual employee performance drive revenue growth.
The cloud infrastructure gives HR employees access to analytics and benchmarks, and the entire system is available via browser or mobile app. Visual workflows and drag-and-drop tools make team reorganizations and big-picture updates fast and easy.
Employees can access their performance, benefits, and even recommended learning all from a single interface.
Oracle is a software company that builds database-driven business software, including human capital management (HCM) software. The HCM tools include three separate modules for human resource management, talent management, and workforce management.
Each of these is available in cloud deployments with browser and mobile interfaces for full service access. The employee interface includes AI-driven action suggestions, company news, and individual and team analytics.
The Workday and Oracle HCM software systems include a wide variety of tools to manage human resources across medium and enterprise businesses. You’ll find many of the same tools in these systems, as they perform essential functions for businesses that know that employees drive their companies. Learn more from Workday Online Course
Human resource management systems in both Workday and Oracle emphasize the financial importance of employees as talent resources and company revenue-drivers. Both tools are built to connect to the company’s revenue and financial databases, brining HR directly into the overall revenue growth model.
This helps CFOs and CHROs come together to make financial decisions on all the possible information, without significant retooling and IT input.
Workday’s workforce planning tools give HR leadership insight into the total cost of workforce from a historical perspective. They can use this information to build predictive models that make better use of the company’s human resources. This includes building hiring pipelines and recruiting models, using popular spreadsheet and project management visualizations to drive hiring projects, and get budget approvals in a timeline that works for hiring.
Oracle’s workforce modeling uses the internal data intelligence tools to understand possible hiring and reorganization needs based on potential business situations. The workforce predictions tool uses business intelligence modeling and data visualization tools to bring insights to all the hiring and employment data that companies already make. Learn more details from Workday Integration Training
And these tools are built for HR teams with little coding knowledge, not for data analysts. HR executives can predict high performance and future openings based on individual metrics, giving the HR team a head start for hiring.
Workday and Oracle provide HCM tools that allow corporate leaders to look at human resources within the larger context of the company’s overall financials. This advanced contextual data means executives can make better-informed decisions regarding salaries, hiring, and benefits.
Workday provides industry benchmarks and uses the software’s database analytics to help companies stay competitive in the marketplace and attract top talent. Companies can add compensation incentives like bonuses, awards, and stock options according to custom rules.
Oracle gives executives access to total compensation metrics including base salary, bonuses, and extras. HR teams can control compensation in the administrative portal and design compensation plans based on business strategy.
To get in-depth knowledge, enroll for a live free demo on Workday Online Training
MuleSoft provides the most widely used integration platform to connect any application, data service or an API, across the cloud and on-premise continuum. Microsoft Azure is a cloud-based data-storage infrastructure that is accessible to the user programmatically via a MuleSoft ‘Microsoft Service Bus’ connector. The Microsoft Service Bus Mule connector allows developers to access any amount of data, at any time and from anywhere on the web. With connectivity to the Microsoft Azure API, users can interface Azure to store objects, download and use data with other Azure services. Applications can also be built for which internet storage is required – all from within MuleSoft Anypoint Platform.
Instant access to the Microsoft Azure API enables businesses to create seamless integration between Azure and other databases, CMS applications such as Drupal, and CRM applications such as Salesforce.

Prerequisites
Microsoft Azure Account
To complete this sample, we need an Azure account. We can activate the MSDN subscriber benefits or sign up for a free trial.

Creating Microsoft Azure Namespace
To begin using Service Bus topics and subscriptions in Azure, firstly we must create a service namespace. A service namespace provides a scoping container for addressing Service Bus resources within the application.
To create a service namespace:

Microsoft Azure Shared Access Name & Key
Click Connection Information. In the Access connection information dialog, find the connection string that contains the SAS key and key name. Make a note of these values, as we will use this information later to perform operations with the namespace

Mule Anypoint Microsoft Service Bus Connector
Send to Queues, Topics and Event Hubs with support of AMQP message properties and header, including custom properties.
The connector supports the following Service Bus versions:
Configure Mule Anypoint Microsoft Service Bus connector with the following settings –
Prior to the execution of a processor, the connector will attempt to lookup for an already established connection and if one doesn’t exist, it will create one. This lookup mechanism is done in the connection pool via the use of connection variables declared as keys. Learn more from Mule Training

Reconnection Strategy: Reconnection Strategies specify on how a connector behaves when the connection fails. We can control the attempts by Mule to reconnect using several criteria –
With a reconnection strategy, the behaviour of a failed connection can be controlled in a much better way by configuring it, for example, to re-attempt the connection only once every 15 minutes, and to give up after 30 attempts. An automatic notification can be sent to the IT administrator whenever this reconnection strategy goes into effect. A strategy can also be defined which attempts to reconnect only during business hours. Such a setting can prove useful if the server is frequently shut down for maintenance.
Mule ESB – The best way to Integrate Microsoft Azure
The below Mule application is used to get the list of queues created under Azure cloud using Mule Anypoint Microsoft Service Bus connector.

Steps to be followed for integrating ‘Microsoft Azure’ with MuleSoft Applications:

Running the Application
We are now ready to run the project! First, let us test run the application from Studio:
Queue list under Azure

Queue list from Mule output

Benefits
To get in-depth knowledge, enroll for a live free demo on Mulesoft Online Training
